
Incubating Eggs:
Disclaimer:
*When we provide you with tips or advice for incubation, it does not guarantee what your hatch rate will be.
*We assume that the buyer is aware of all the risks with the shipping of eggs or picking up hatching eggs, and they feel comfortable taking that risk.
*Our incubators, brooders, experiences with hatching, and climate may be different than yours.
*Each hatch is unique regarding hatch rate, and there are too many outside factors to consider, and not every egg may start growth even if your eggs were picked up.
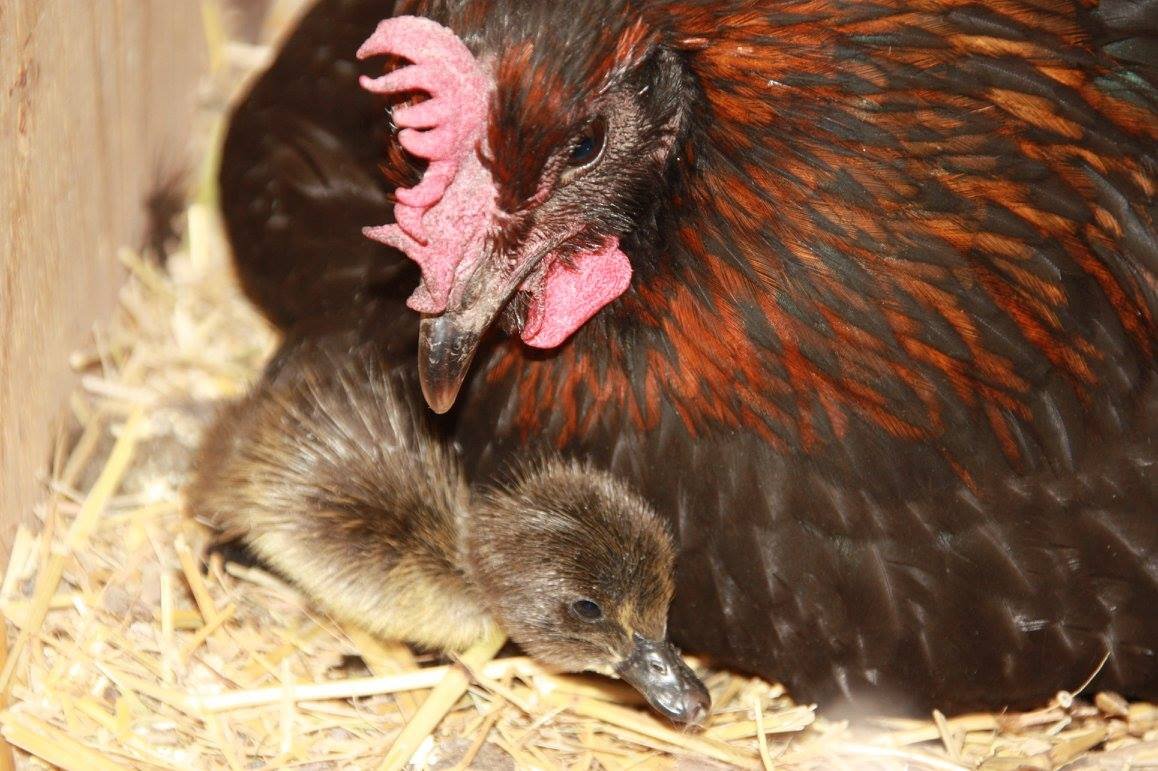
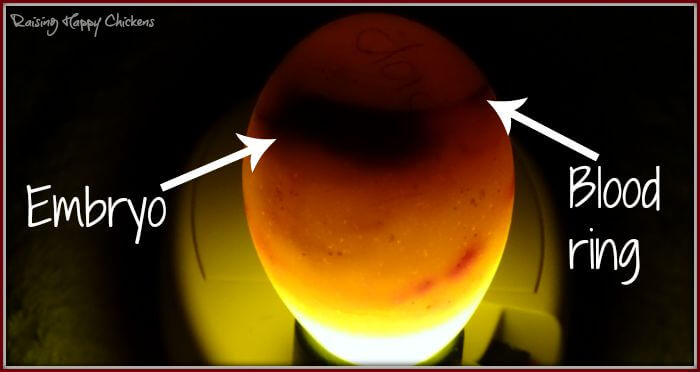
The blastoderm is the embryo-forming portion of an egg with discoidal cleavage usually appearing as a small disc on the upper surface of the yolk mass. “When an egg is fertilized by a rooster, the blastodisc becomes known as the blastoderm, which is the first stage of embryonic development…. When a fertile egg is incubated under precise, steady temperatures and humidity levels for 21 days, the blastoderm may develop into a chick.” https://the-chicken-chick.com/facts-and-myths-about-fertile-eggs/
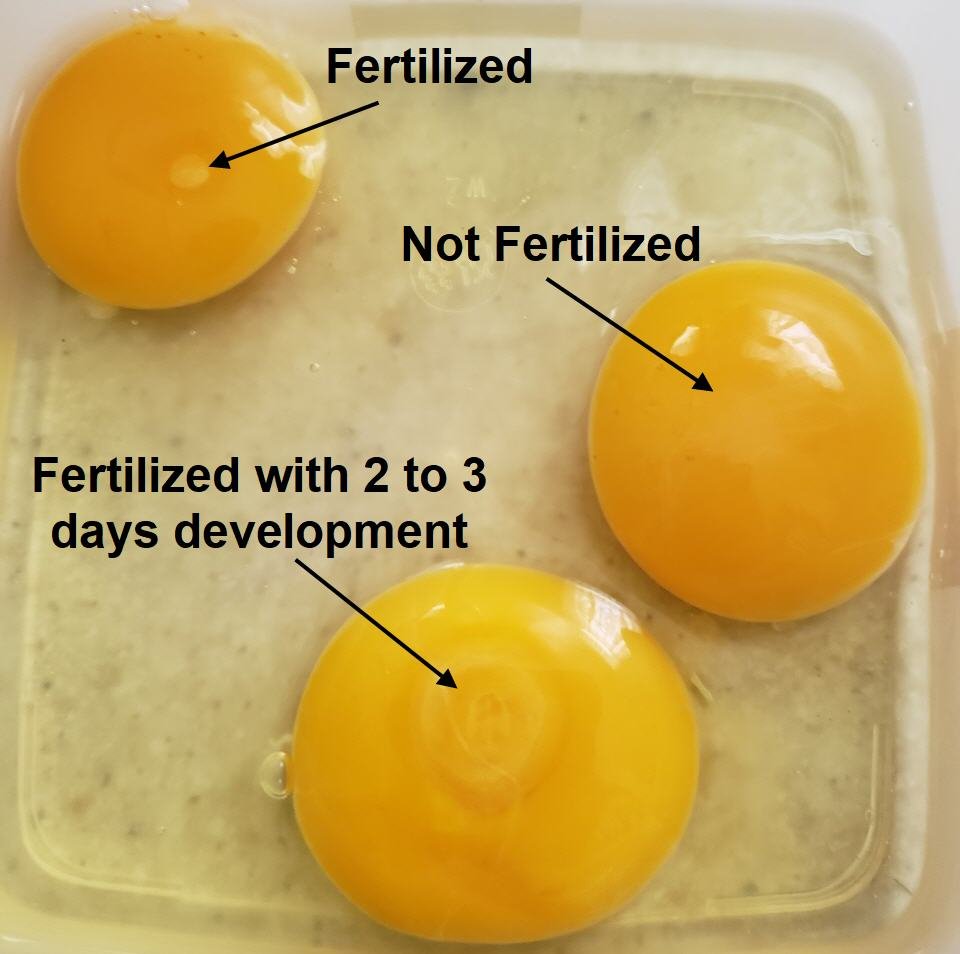
* A fertile blastoderm in the egg may look infertile after a short time in the incubator. Hatching eggs that have been damaged during transit or eggs may die early in the incubation process. Therefore, cracking the eggs during or after the incubation process in order to determine fertility is not going to be give you a precise ratio of fertile to infertile eggs.
*Although our breeding pens contain multiple roosters, each heritage breed has different needs. The age of the birds is also an important factor, as we typically have a mix of both older and younger birds in each breeding flock. The same applies to our duck flock as well.
* Each year is different with regards to the weather, which directly affects our birds. Fertility and egg production will fluctuate due to weather variables (ie. heat, smoke, drought, cold and rain) and this is out of our control.
* Some chicken breeds prefer warmer weather before commencing to fertilize and lay eggs. “Temperature may also play a direct role at the time of egg formation: there are costs associated both with the development of the reproductive organs (Williams & Ames 2004) and with producing eggs (Stevenson & Bryant 2000; Visser & Lessells 2001; Vezina & Williams 2002). At low temperature, these costs are higher (Stevenson & Bryant 2000) and thus may constrain laying date.” Temperature has a causal effect on avian timing of reproduction – PMC (nih.gov)
*We prefer to use Brinsea and Sportsman Cabinet incubators at Wild Acres but that does not guarantee 100% hatch rates. Each hatch and every hatching year is unique for us and our poultry/waterfowl.
* Once you receive the hatching eggs, their care is in your hands.
*Fertile eggs that are picked up from our farm should be left to set for about 24 hours prior to setting them in the incubator due to the possibility of condensation issues in the egg, handling and fluctuating temperatures.
*If eggs were shipped via Xpresspost let them set in a cool room with the fat end up for 24 hours before incubation at 7.2 – 15.5 degrees C or 45 – 60F. Target humidity for fertile egg storage is 75%.
*If your eggs arrive late via Xpresspost they can be set in an incubator but do not use the turner for the first 24 hours.
*Get an incubator with digital display if you can. We like to use Brinsea and Sportsman models and we keep our incubators in the cool basement away from windows and drafts.
*It’s critical not to raise the lid of the incubator in the last days of incubation and during the hatch, so consider the viewing window size or location when purchasing an incubator.
*If you get a Styrofoam model incubator set the eggs directly under the fan in the middle of the incubator. Consider setting it on a towel and wrapping the edges with a towel to keep humidity and temperature more constant and put it on a table in a room without drafts and away from windows.
*When you put cold eggs in an incubator, it can take three hours or more for eggs to warm up and temperature to stabilize at the setting you had before adding the eggs. Also, when you open the incubator, it can take up to two hours for the temperature to stabilize.
*Any incubator will produce better results when operating at capacity. Egg capacity is a factor.
*You will need to use an egg turner (unless it is built in like many Brinsea models) or turn the eggs by hand and mark one side with an X and the other with an O. In small incubators, the eggs should be turned at least three to four times daily. The critical time for turning eggs is during the first week of incubation.
*Keep a small spray bottle with room temperature water handy to spray the eggs a bit when you need to open the incubator. It keeps the humidity more constant. We use Reverse Osmosis water in the incubator humidity pumps and our spray bottle as it does not leave mineral residues in the incubator or on the eggs.
*Keep the incubator in a room that the heat or humidity does not change much. We prefer to incubate in the basement as the temperature and humidity it more constant. Maintaining the incubator room temperature between 21C and 24C with good ventilation and relatively high humidity will increase your hatch rate. Be sure no direct sunlight strikes the incubator and that it sets level.


*You can use paper towel pieces to make the eggs sit tighter if you want in the tray, so they don’t rock around. We do and it does not affect the hatching humidity or eggs.
*In the cooler months of spring such as April we incubate at 37.4C to 37.5C with a daily humidity of about 49-55%. On a regular cooler hatch day, we raise the humidity up to 58-62% for chicks. For ducks, geese and turkey poults we may raise it as high as 60-62% due to their thicker eggshells and depending on the dryness of the room at the time.

*For incubation on hot humid days (30C) keep your humidity level lower. We use a fan that circulates the air in the incubator room. It keeps the heat and humidity more constant.
*Central air conditioning also adds to the dryness factor in homes.
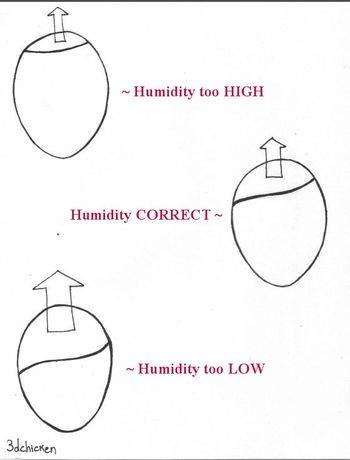
*Check your air sac size to see if you need to increase the humidity or decrease the humidity in your incubator.
*Elevation level may also play a part in incubation (ie upstairs vs downstairs, the floor vs the table) as does your individual incubator choice. Each incubator is unique, and it takes time to understand and operate successfully. Heat rises, and we feel that makes also affects the incubator interior temperature and the hatch rate.
*Our incubator that sits on a table in a cooler corner of the room holds the humidity better and does not need to be refilled as often with water in the humidity tray. The incubator in the centre of the room on a table needs the water refilled more often and does not seem to hatch the eggs as well even though they are both the same incubator type, model and age and it is the same room. You want the incubator in an area that the temperature and humidity will not fluctuate much.
*When we tested the humidity under our broody bantams and standard sized hens and turkeys they had a relative humidity underneath them of 52-65%. However, broody hens shift around and take breaks when they feel the eggs are too hot so that the eggs get periods in which they cool down. Some incubators can be set for cool down periods, but they are doing it automatically. Please don’t overdo the humidity or your eggs may not hatch properly.
*Leave your vents at least half open during incubation, maybe more depending on how your humidity is holding. Humidity depends on many factors including elevation and your type of incubator.
*On hot days allow more air flow for the eggs especially during the hatch stage when you should open up those vents all the way. Ventilation is very important in any incubator at hatching time. Insufficient ventilation may result in embryo or chick death. We also add a fan to circulate and cool the air in the incubation room.
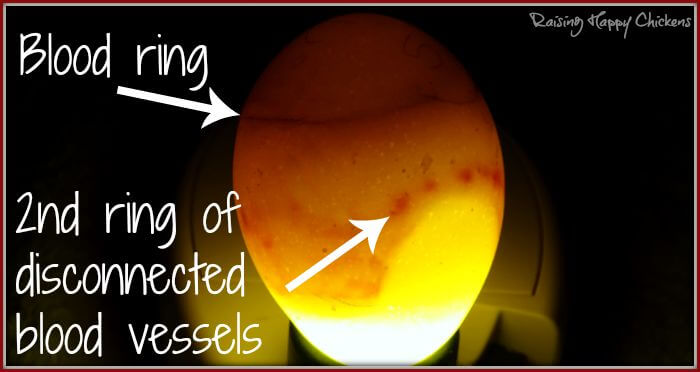
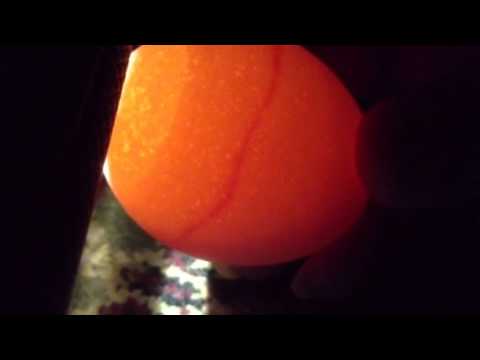
*Rough handling of hatching eggs before they are set or while they are being candled will increase the number of dead embryos, with mortality occurring between the 4th and 13th day of incubation. Jarring eggs during incubation may result in the rupture of the eggshell membrane and will thereby lower hatchability. Pictures below show the “Blood Ring” or “Ring of Death”. Throw these eggs out.


*It is difficult to candle and see inside dark coloured eggs such as Marans, Ameraucana, Olive Eggers eggs as well as some other dark brown egg layers.
*It takes 21 days for chicks to develop and 12-24 hours to hatch. If there is a delay in heating the incubation and hatch time can take longer. It takes 28 days for Runner ducks, goslings and turkeys to develop fully before the hatch, but they take a longer time to hatch, due to their thicker shells.
*Resist the urge to open the incubator during the hatch stage. Humidity levels are extra important at this time and by lifting the lid, you allow the humidity to escape.

*Rescuing one chick could mean the loss of the others. An egg with a pip in it means it is very venerable so don’t open the incubator lid during the hatch phase. The chicks/eggshells will lose humidity rapidly if exposed to the drier air from outside of the incubator and they may get stuck in the shell and unable to hatch.
*A chick that doesn’t hatch on its own will always have problems, either from infection or physical damage.
*Chicks can take up to a day to finally break free of their shells, so don’t panic if it seems to take ages.
*The appearance of chicks panting in a hatcher at normal temperature is an indication of a rise in the carbon dioxide content of the hatcher air. Under such conditions chicks must breathe faster to obtain the required amount of oxygen and to eliminate the excess carbon dioxide. If excessive panting occurs, increase the airflow in the hatcher and turn down the temperature of the incubator by .5C
*Practice strict sanitation; cleanliness is very important for every successful hatching operation. Keep the eggs clean. Perspiration from the hands or any sort of grease stops up the pores of the shells.
*If your chicks hatch out a day early, it indicates temperature was a little too high, so on your next setting of eggs lower the temperature by 0.5 degrees for entire incubation period. If chicks hatch a day late, raise your temperature by 0.5 degrees for entire incubation period.
*Incubating eggs suffer much more from higher temperatures than they do from lower temperature within a range of 1-degree C

*Please remember that a 100% hatch rate is not guaranteed even in the most ideal circumstances. 80% is considered a successful hatch. If your eggs have been sent to you by post, that will potentially drop to around 50% or even less. Even experienced hatchers or high-end incubators suffer losses and all we can do is to try again.
*Where the incubator is kept while incubating makes a difference in humidity and temperature. Keep the incubator in a cooler room away from drafts, windows and temperature fluctuations.
*Some eggs may hatch earlier or faster, depending on their breed type, size and structure. Either way, make sure that the incubator stays in the right setting throughout the period. Being exposed to the wrong temperature and humidity level even for a short time can severely affect the chicks’ condition.
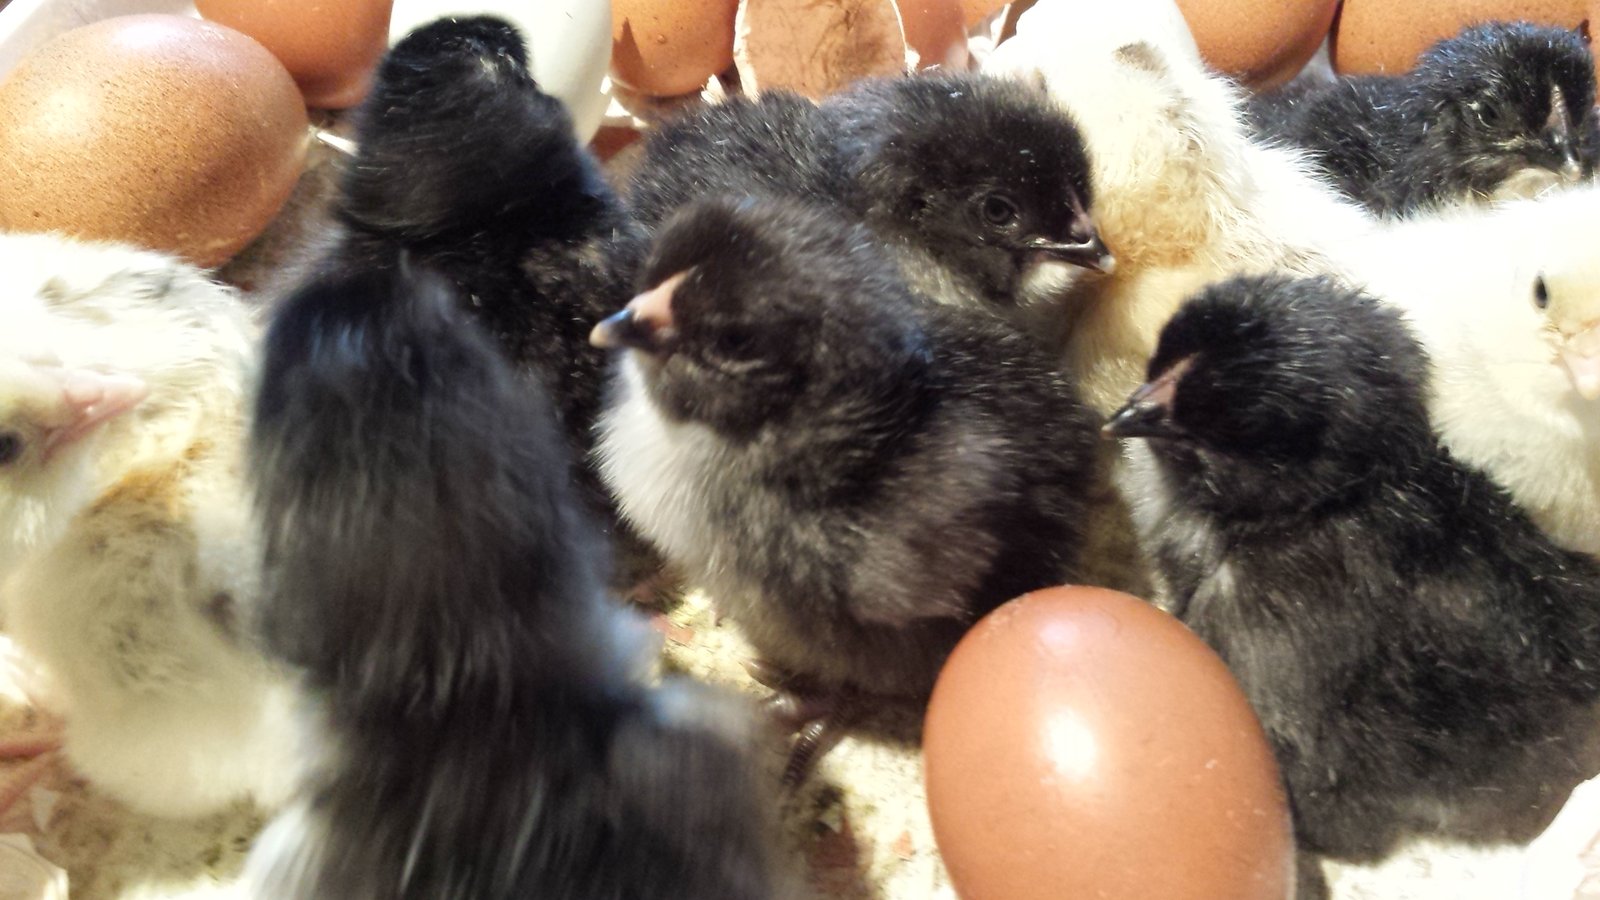
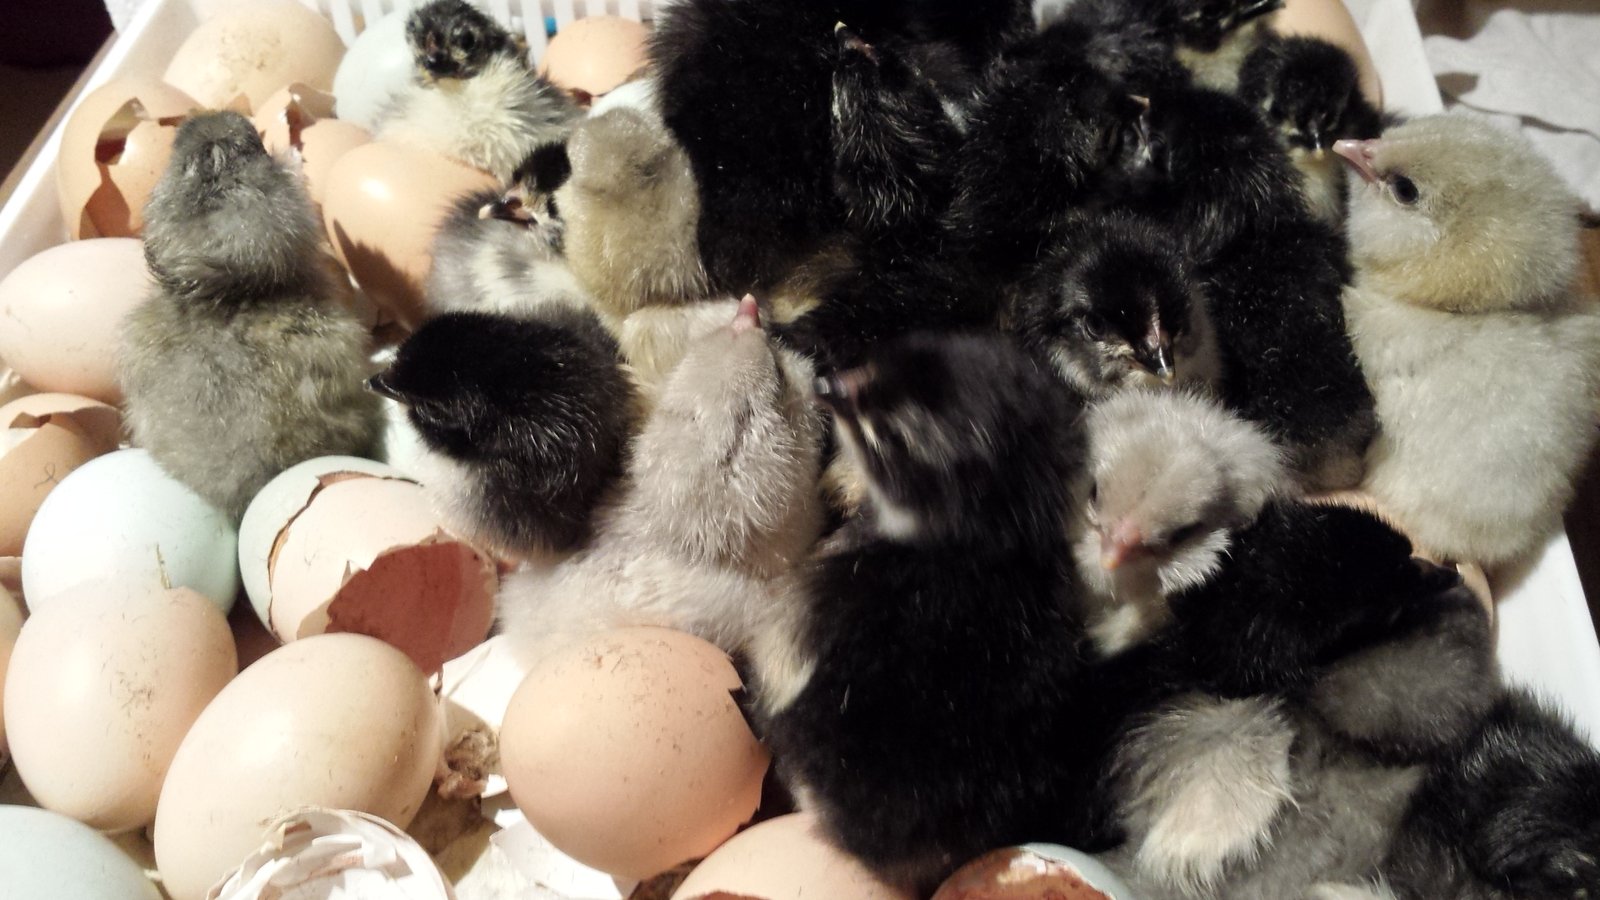
*Once chicks are hatched, leave them together in the incubator for at least 12-24 hours, to give them time to dry out and rest and even walk/run around. Just hatched chicks can survive without food for up to 48 hours.
*Remember that newly hatched chicks are only days old, and it is understandable to feel excited but it’s important to know when to leave them alone. Attend to their needs and avoid touching them too much. Playing with them is not recommended, as they will get stressed and could catch a chill.
*Understand and accept the many challenges of hatching eggs and know that you will want to hatch more eggs again as hatching chicken eggs can be fun, educational and addictive.
Happy Hatching!


Caring for the Chicks, Poults, Ducklings and Goslings: Our suggestions
*Please do not mix chicks in with other chicks from a different farm right away. New birds should be segregated and monitored for at least 30 days before entering your existing flock in order to prevent stress and disease.
*Wild birds and other animals such as mice can carry a range of disease-causing viruses, parasites and bacteria. Make sure that your birds and their food and water are kept away from wild animals. Promptly clean up spilled feed and litter, and keep feed in sealed, waterproof containers to avoid attracting unwanted guests and to protect it from becoming contaminated.

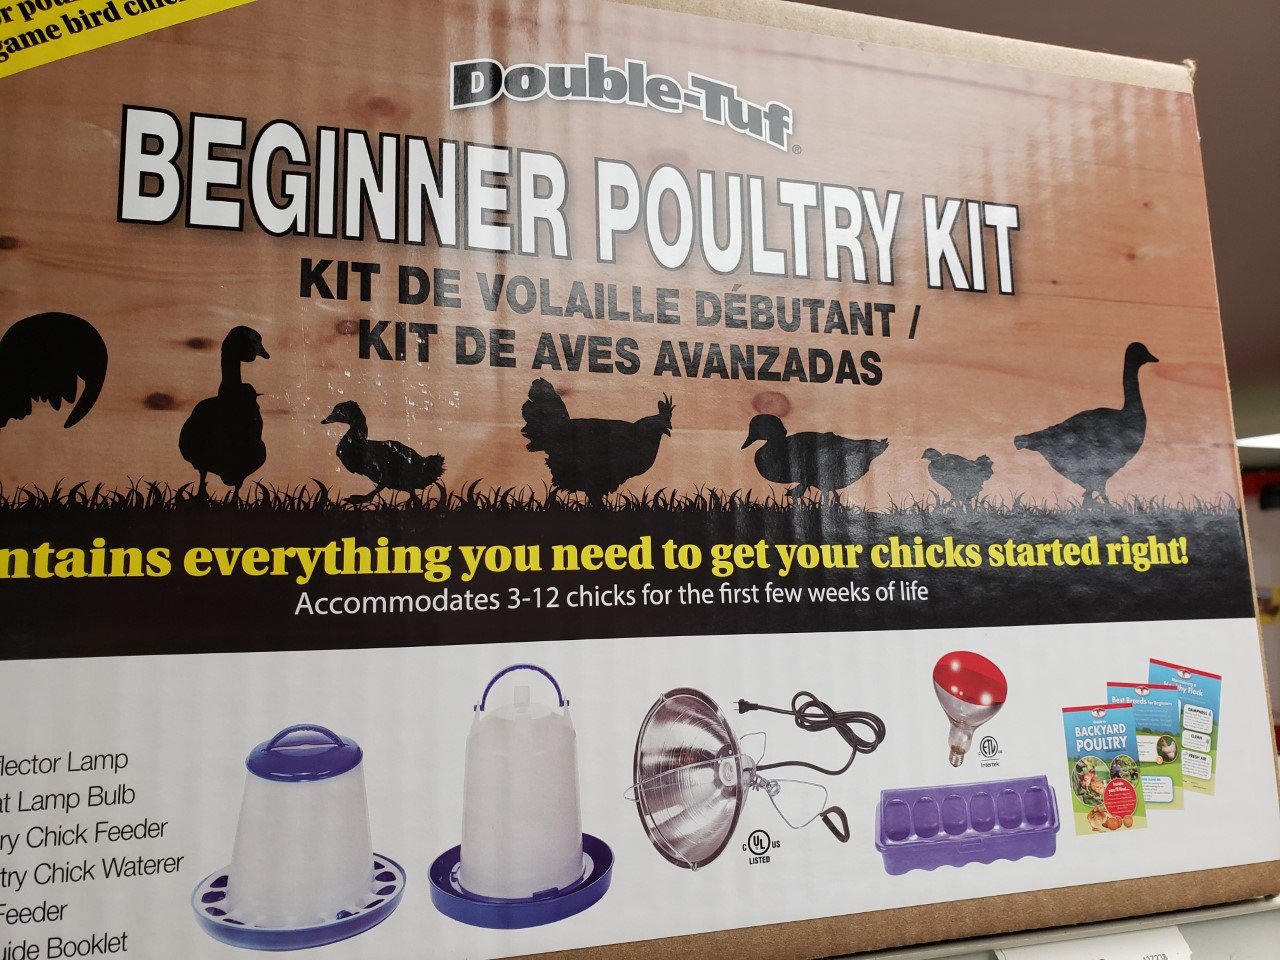

*You can find 18-inch cardboard brooder guard and beginner poultry kits or accessories at your local feed store and in some hardware stores that carry farm supplies.
*It is best to prepare your brooder area for chicks, poults, ducklings and goslings before you purchase your new stock. Use an 18-inch cardboard brooder guard to prevent drafts and adjust the height of your 250-watt heat lamp using a thermometer as your guide (32 degrees Celsius or 89.6 degrees Fahrenheit) for chicks and ducklings or 35ºC-38ºC (95ºF-100ºF) for turkeys and bantam breeds.
*Start your heat lamps 18 inches from the floor. Chilling often results in long term problems with the heart, legs and their growth rate. Please keep them warm and safe during their ride home so they don’t catch a chill.
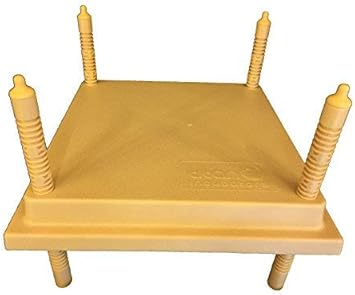
*If you have a warm room available in your home (it will get dusty from the chicks) or in a heated building you can use a broody hen heat replacement lamp instead of a 250-watt heat lamp for your chicks. It is a little plastic table with a heating pad underneath for the chicks to snuggle under. The temperature stays the same underneath, and you can adjust the legs as the chicks grow but it can only work for a limited number of chicks, and they will still need a light to see their food and water.
*We suggest heat packs for day-old chicks, poults and ducklings for the trip home as they cannot regulate their own temperature for the first few weeks. See our online store for the purchase of a 72-hour heat pack.
*This is an excellent article to read: Brooding Temperatures for Small Poultry Flocks
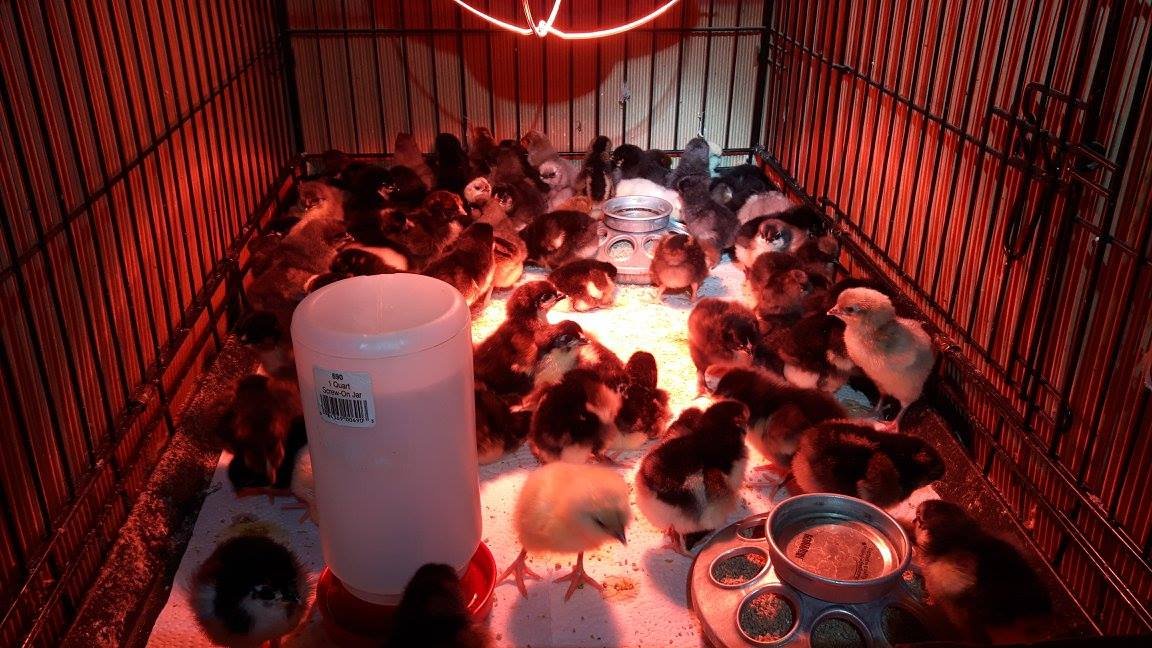
*Note the 18-inch brooder guard paper/cardboard surrounding the outside of the cage to keep drafts out and to keep the chicks warm.
*It is very important to keep your brooder area dry and clean. Drafts, high humidity and or heat and ammonia are harmful and cause sickness and death. It can happen quickly so make sure you check on the chicks and or ducklings at least twice per day and make adjustments to the environment as needed.
*”A healthy bird will typically have a higher relative proportion of beneficial bacteria in the gut. However, in times of stress, this balance can shift. Maintaining a high population of these beneficial bacteria in the gut of your birds is critical. Summer Nutritional Requirements (chickenwhisperermagazine.com)”
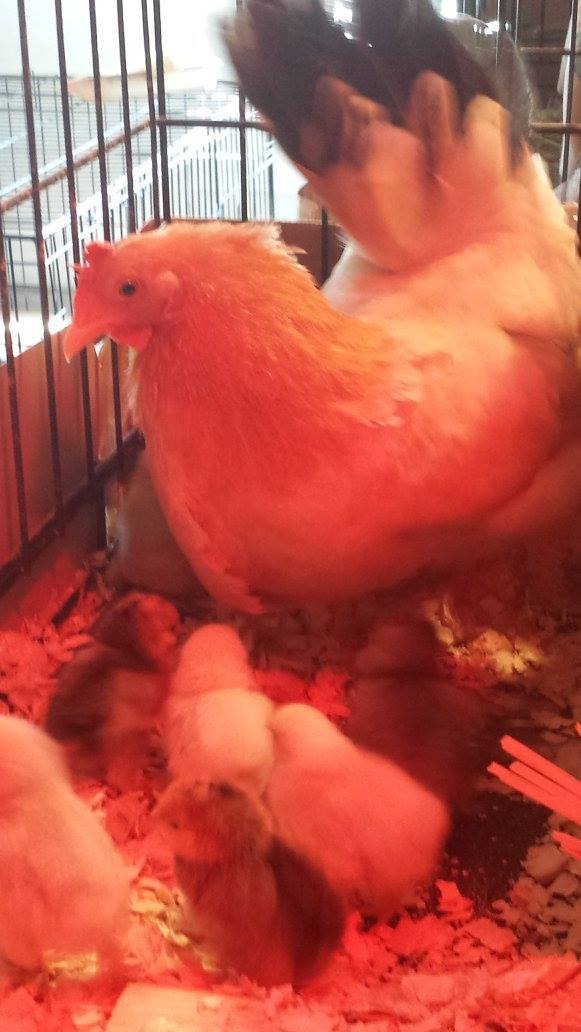
*A mother hen is constant source of heat, guidance and protection and she would not leave her offspring alone for very long. Otherwise, they may perish. You are taking on the role of the mother hen when you decide to build a brooder and raise chicks.

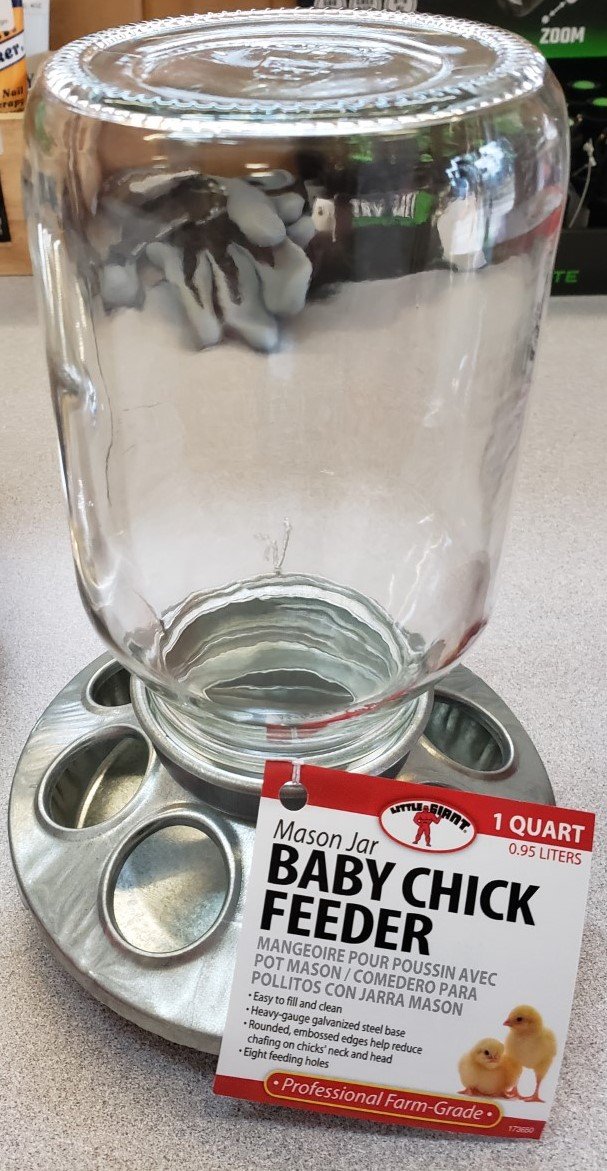
*A regular sized gallon chick water or feeder can be used for up to 12 chicks or more but they grow quickly and a second feeder is recommended so that smaller chicks have space at the feeder and do not get pushed around or trampled.
*We clean out our waterers and feeders 2-3 times a day for developing chicks and we adjust the height of the feeders and waterers, lights and air flow as needed throughout the day.
*When you move the newly hatched chicks to a brooder set up use paper towel or shop towel on the floor for the first day or two. Sprinkle chick starter feed around on the floor of the brooder area and put the feeder in the middle of it. The chicks will more readily find the find the feed this way and not mistake shavings for the food instead.
*After a day or two you can take the paper towel flooring away and add some pine shavings. Newspapers are too slippery and may cause leg problems.
*The surface of a newspaper is too smooth for chicks to safely move around on it. Your chicks can actually get the injury known as ‘splayed leg’ from slipping on newspaper—an injury that results in death if not treated.1 Newspaper bedding for your chick brooder: Not your best choice — The Featherbrain

*We use Diatomaceous Earth (DE). It is a fine white powder that can be bought at your feed store. We sprinkle it on the floor of the brooder before adding the shavings on top. The Diatomaceous Earth keeps the brooder and chicks dry, it acts as a beginner grit for them too. They will eat some of it but do not be alarmed. It assists with their digestion and the will aid in keeping the smell of ammonia down in their droppings and brooder. We also use it in our hens’ nesting boxes under the straw to assist in keeping pests at bay and under the shavings in our coop. Be aware that DE is a fine white powder and if an extremely large amount is inhaled, people may cough and have shortness of breath. Diatomaceous Earth General Fact Sheet (orst.edu)
All about Diatomaceous Earth | In your Chicken Coop, Garden and Home – Fresh Eggs Daily®
*The temperature for your chicks needs to be about 32 degrees Celsius (89.6 degrees Fahrenheit) for their first weeks. When the chicks are huddled all together under the light and they are crying then you need to raise the temperature. When they are laying down in the corners, crying and they have their beaks open and panting, please check your temperature as they are probably too warm and stressed.

*During the really hot summer months we use low wattage red reptile lights with radiant heat. You can obtain them from pet stores in wattages of 50, 75 or 150. Our older chicks prefer them during the warmer weather and they work great for chicks that already have feathers and are about 2-3 weeks of age.
* If you are raising a mixed flock and have different breeds of chicks in the same brooder you will note that some chicks are larger when they hatch, or they may grow faster than the smaller breeds. Observe your chicks daily for development and know that you may have to provide a separate brooder area for the smaller or slower developing chicks so that they also have access to feed, water and heat without becoming trampled.
*Do not be in a rush to take away or shut off the red heat lamps, especially for smaller breeds and bantams. They need to be fully feathered in first and we recommend that they should be at least 8 weeks old or older for larger standard sized breeds.
*High heat temperatures such as 28C-36C and higher can cause stress, panting and even death so turn off the heat lamps in extreme heat, move them to a cooler location and or provide a fan. Chicks that are 2 weeks old and have feathers will handle temperature fluctuations better.

*A mother hen will keep her chicks warm and protected until they are full sized pullets and or cockerels as seen with this bantam hen in our old coop. She is the buff coloured Japanese Bantam.
*Bantam chicks and smaller breeds or slow developing breeds may need the heat lamp for a longer period of time depending on the weather, their development, size, and feed. Bantams and slower growing chicks should be provided with a higher source of protein and or chick starter, which is higher in protein for a longer period.

*We continue to provide bantam breeds with higher protein their entire lives. You can mix unmedicated chick starter into their adult bird feed. We also feed unmedicated chick starter mixed with grains to our molting birds and breeders.
*Make sure you dip the chick’s beaks in the water about 3 times each when you first introduce the chicks to the brooder to ensure they get a good drink and learn where the water is. Keep the food and water close to the heat source but not directly under it as the water may heat up.
*Change the water 2-3 times a day for the chicks and keep it free of shavings and droppings or they may get sick. We raise our waterers on blocks of wood or bricks and hang them as the chicks grow. We also hang our feeders.
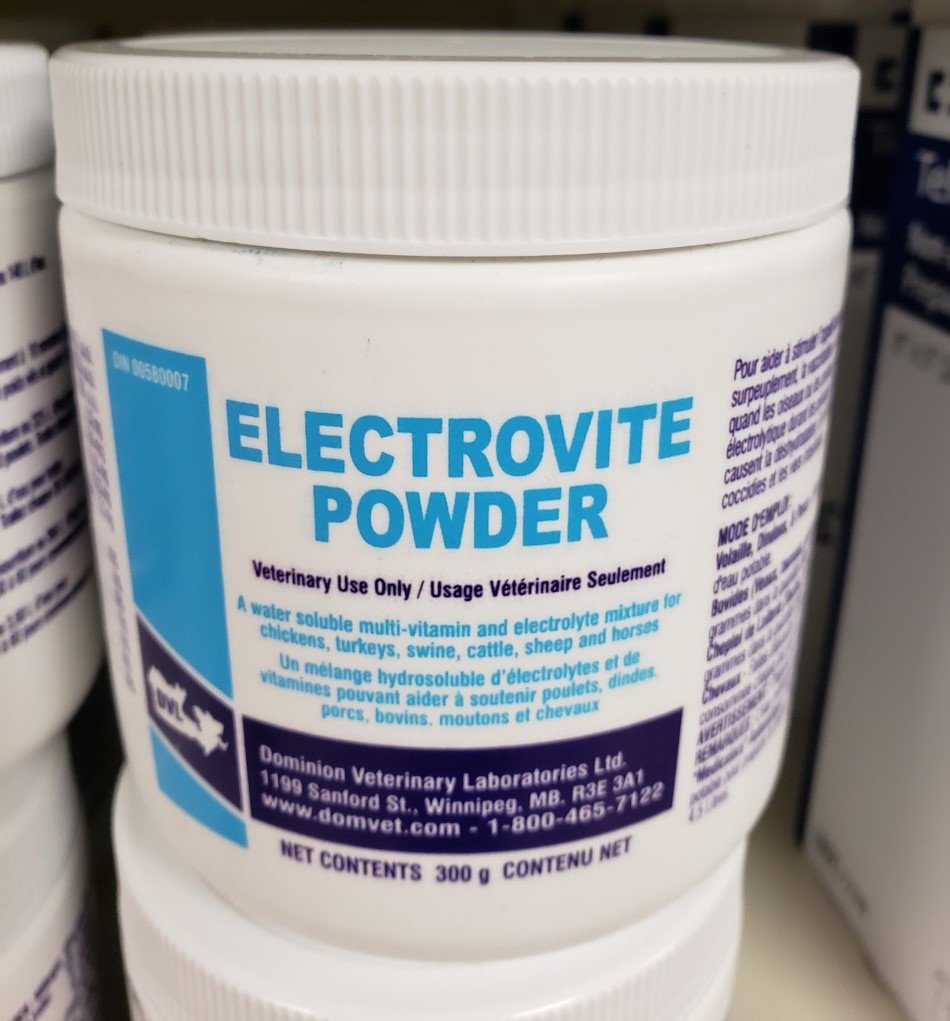

Electrovite and Poult-Vite can be found at your local feed store.
*We use about 1/4 teaspoon of Electrovite per quart for chicks and 1/4 per gallon for the hens. We prefer it over regular chick vitamins and they prefer it too. It works great for times of stress, hot summers and for growing out chicks or breeding chickens. We buy it at the local feed store and our local hardware store also sells chicken supplies. It can be used for the other animals on your farm as well.
We breed for resistance at Wild Acres and we do not believe in vaccinating our birds. The Marek’s vaccine is a leaky vaccine. This means that it doesn’t prevent a bird from getting Marek’s, it only reduces the severity of the symptoms if they get it. In fact, rather than stop fowl from spreading the virus, the vaccine allows the disease to spread faster and longer than it normally would, a new study finds.
Vitamin deficiencies can also look like very much like Mereks:
https://thepoultrysite.com/publications/diseases-of-poultry/217/vitamin-b2-deficiency
https://www.backyardchickens.com/articles/the-great-big-giant-mareks-disease-faq.66077/
If you are living in a remote area or you need something readily available here is a homemade recipe for electrolytes.
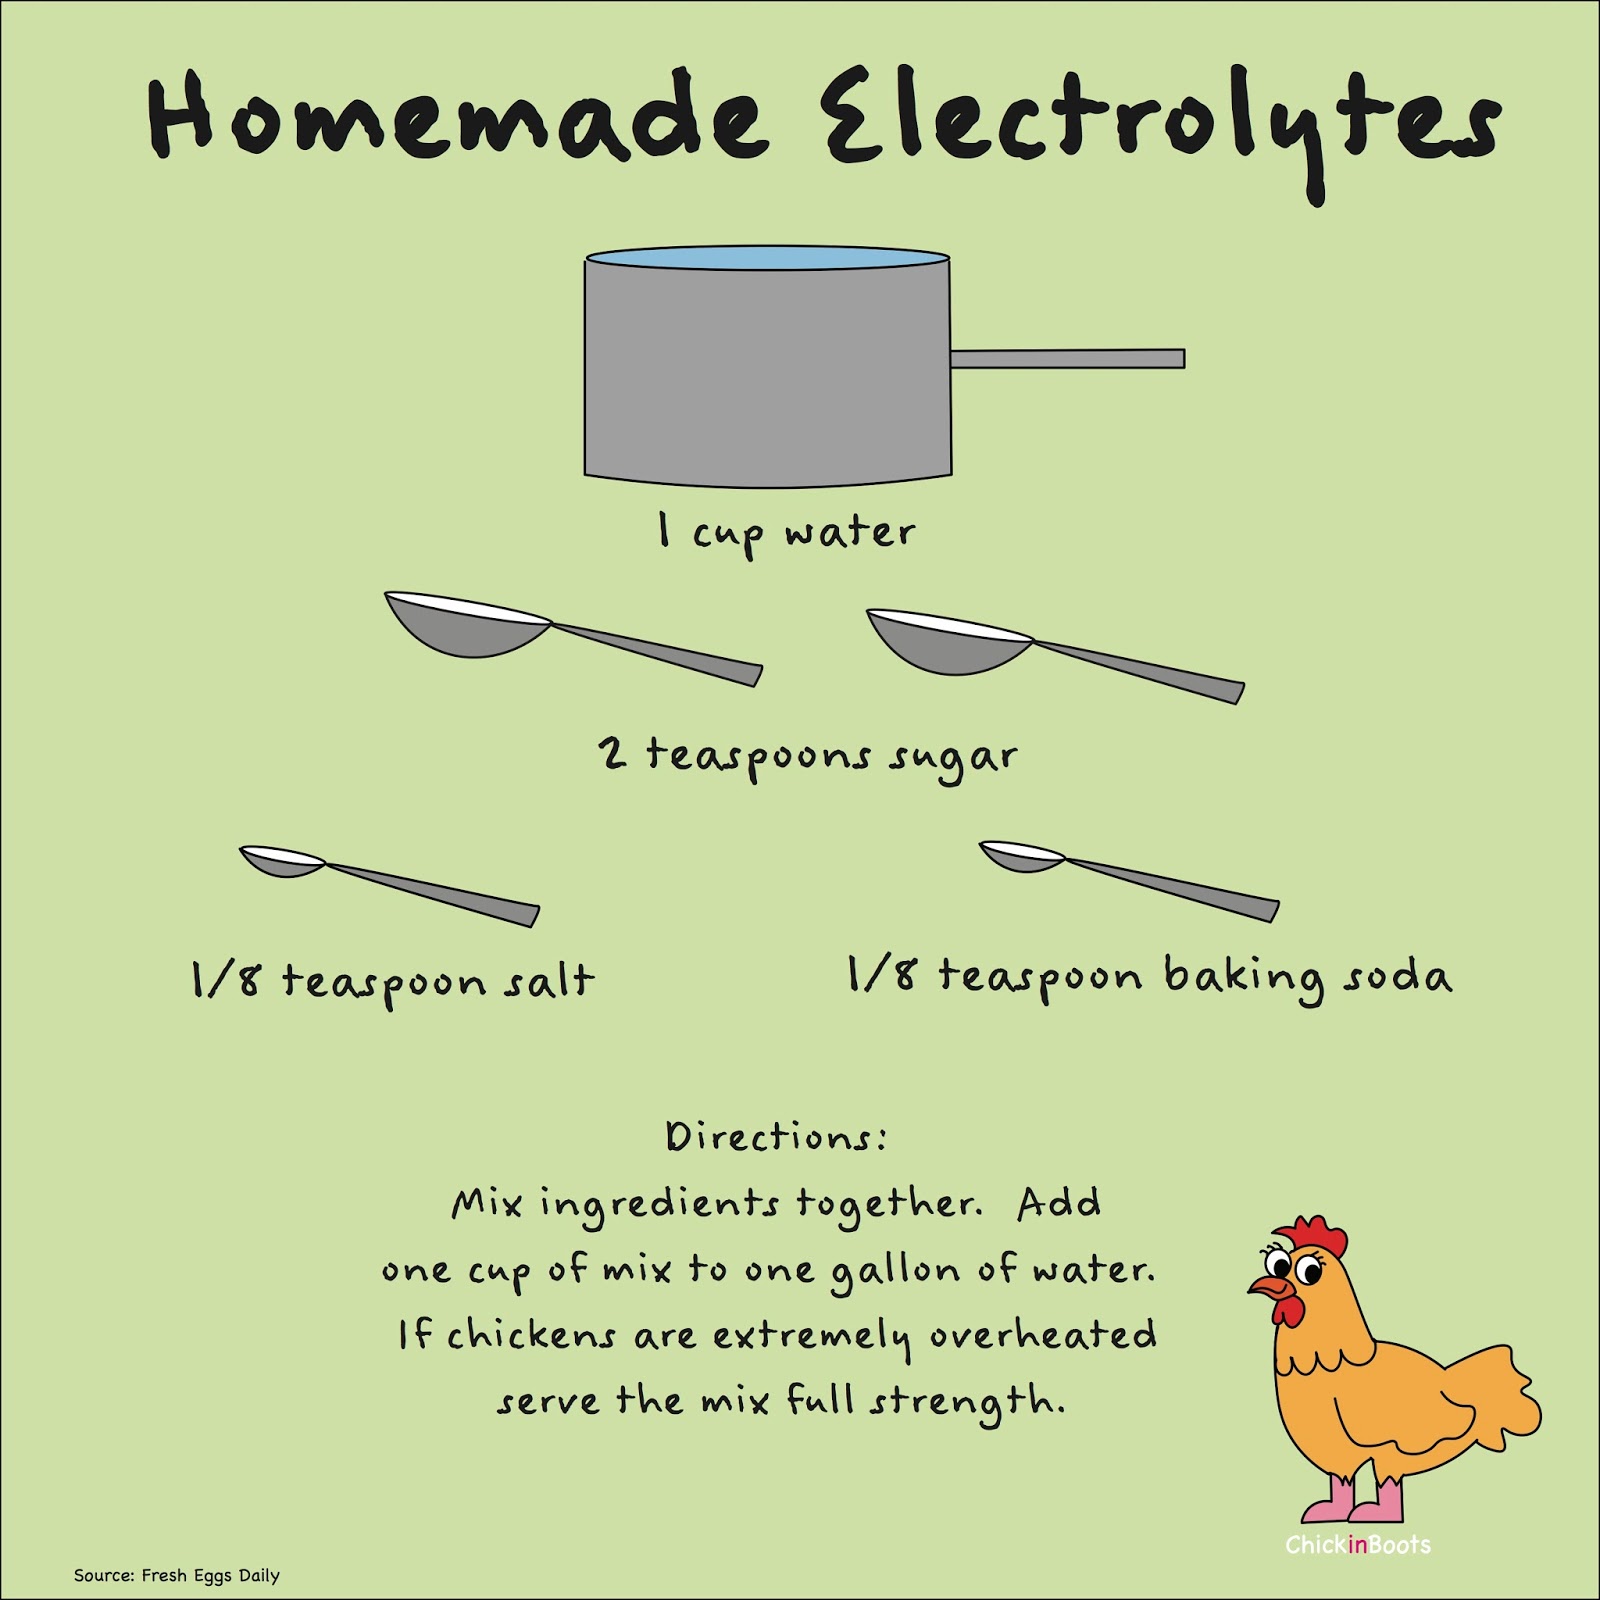
*We also add about 1 capful of Bragg Apple Cider Vinegar per gallon of water to my chick, ducklings and adult poultry or waterfowl waterers, this gives a boost, promotes feather growth and it keeps the water cleaner. (Do not use Apple Cider Vinegar with metal waterers, as they will rust within a few days).
Wild Acres prefers to use Bragg Apple Cider Vinegar especially with our youngest chicks, poults and waterfowl as it contains the amazing Mother of Vinegar, which occurs naturally as strand-like enzymes of connected protein molecules. Certified organic Bragg organic raw apple cider vinegar is unfiltered, unheated and unpasteurized.
Our Chicks feather out quicker and are a lot healthier when compared to chicks given the regular filtered apple cider vinegar. We find Bragg Apple Cider Vinegar also benefits our own health and it tastes great mixed in salads. You can find it at your local grocery store.
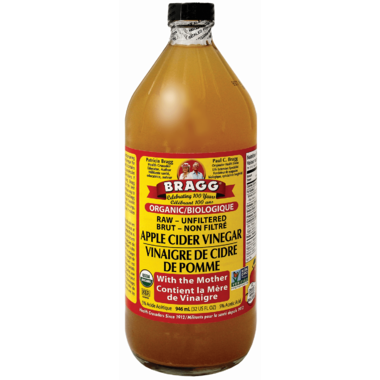
Bragg Apple Cider Vinegar Details
- Rich in enzymes & potassium
- Support a healthy immune system
- Helps control weight
- Promotes digestion & PH Balance
- Helps soothe dry throats
- Helps remove body sludge toxins
- Helps maintain healthy skin
- Helps promote youthful, healthy bodies
- Soothes irritated skin
The Apple Cider Vinegar Benefits For Poultry and Waterfowl Are:
*Reduces intestinal and fecal odors. *Aids in digestion. *Helps to break down minerals and fats.
*Assists the animal to assimilate proteins. *Assists the animal to convert food better.
*It lowers the pH of the digestive tract which will make an environment less welcoming to pathogens therefore may reduce common infections and increases resistance to disease. *Improves stamina and fertility. *It is a great overall tonic that will improve the general well-being of the animal.
If started while Birds are young (1-1/2 to 2 weeks), birds
*Will feather out quicker. *Are hardier. *Grow to their potential sooner when used with an adequate feed. *Apple Cider Vinegar is rich in the vitamins, minerals and trace elements found in apples, especially potassium. * It will normalize pH levels in the stomach, improve digestion and the assimilation of nutrients. *Apple Cider Vinegar (ACV) won’t work as a “Natural” Wormier- it has little effect on worms.
Cautions:
Do not use metal water dishes (except stainless steel).
Vinegar should not be used internally with animals that have an irritated lining of the intestinal tract.
Do not use Apple Cider Vinegar while treating for worms or coccidiosis.
Chicken Heat Stress, Dehydration and Homemade Electrolyte Solution
http://www.the-chicken-chick.com/2012/07/chicken-heat-stress-dehydration-and/
“Acidified water affects laying hens by making the calcium in her feed a little less digestible (based on chemistry….calcium is a positive ion, and dissociates better in a more alkaline environment). Professional farmers regularly add baking soda to their feed when heat stress is expected….this maintains egg shell quality when hens’ feed consumption drops due to the heat.”
In summary, during high heat conditions, baking soda facilitates calcium absorption while vinegar inhibits it. SKIP the vinegar in the heat, opting for an electrolyte solution instead.
An article from Fresh Eggs Daily:
http://www.fresheggsdaily.com/2012/07/hot-weather-acidosis-and-homemade.html
Temperatures between 55-75F (12.77-23.88C) are optimal, anything higher starts to cause stress to their bodies.
How to make a simple nipple waterer for your chick brooder –click on this link for instructions 
*On our farm we do not vaccinate our chicks, so we feed them medicated chicks starter that contains Amprollium, which is a coccidiostat that reduces the growth of coccidia oocysts. Coccidiosis is the number one killer of baby chicks. Medicated chick starter is 18-20% protein, and turkey starter is 25% protein.

*Our chickens are heritage layers, pets or dual-purpose breeds so they do not grow the same way commercial broiler chicks or breeds do. Therefore, we continue to feed them starter feed for about the first 16-18 weeks of growth depending on the breed, the size of the chicks and or the pullets.
*Not all chicks or pullets grow at the same rate. Grower is for putting weight on meat birds and it has less protein and slows down their growth, which works for great for meat birds but not necessarily heritage birds. Please make slow, gradual changes to a chick or chicken’s diet.

*Silkies and smaller or slower growing breeds need a higher protein diet for a longer period of time. We continue to feed our Silkies and smaller breeds higher protein their whole lives. It promotes feather growth and keeps them stronger and healthier.
*The gizzard is a muscular part of the digestive system that “chews” food by using small stones, or grit, to grind the food up. Chickens need grit because they don’t have teeth. Chick starter is typically milled finely enough so that baby chicks don’t usually need grit unless they’re eating something other than starter. Chickens will need grit once they begin eating treats, grains and other foods, for example if they’re foraging in the yard. If your chickens free range, they will probably pick up grit, gravel or small stones on their own, but we recommend providing free choice grit and oyster shell daily.
*When the chickens reach the age of about 19 weeks and they start turning into a young pullets you can start mixing in layer crumble (16-17% protein) slowly. On our farm we also add a scoop of cracked corn, some whole wheat, kelp powder and grit to a 2.5-gallon bucket for the young pullets diet. We suggest adding some NON-GMO layer ration when they are adult birds as it is pea based and it seems to help to keep the shells harder. We use 1-2 size grit and oyster shell for digestion and hard egg shells.


*DO NOT feed medicated feed to waterfowl as they eat twice as much as chicks during their growth period and it may harm them. Feed young goslings a waterfowl starter or non-medicated chick starter for only a week to 10 days to avoid Angel Wing.
*Feed ducklings non-medicated starter for up to 3 weeks and then switch them over to grower crumble. Later you can give them some wheat, mixed grains, grit and greens (especially for goslings/geese). The excessive intake of carbohydrate (ie bread) and proteins (20-25% protein) during development may give waterfowl Angel Wing (crooked wings). https://en.wikipedia.org/wiki/Angel_wing
*Please remove build ups (pasty butts) with a quick pull or soak it with warm water before removing. Pasty butts may indicate chilling or stress such as over handling or a change in environment. Baby wipes are handy to keep in the brooder room and the barn.
Growing Up: These are our suggestions
*As the chicks get older, you can lower the temperature in the brooder by about five degrees each week. When the outside temperature is about the same as the brooder temperature, you can move the chicks to a secure outdoor coop as long as they are of good size and fully feathered in.
*We set up two different lights in our broody area. One is a typical red 250-watt chick light and the other one is a red reptile light with either a 150, 100 or 75-watt bulb. Both are hung with chains and clips. Depending on the weather we can use one or both of the lights. During the summer heat or when the chicks are older and have grown feathers we may only use the lower wattage light. The chicks seem to prefer the red infrared basking reptile lights. The reptile lights spectrum probably stimulates growth and digestion the same way it does for reptiles.
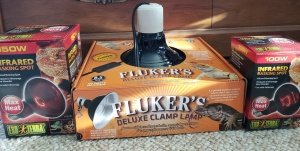 Reptile lights and bulbs can be found at your local pet store.
*At about six weeks of age, most larger breed chicks have feathers but it’s best to wait until these standard sized chicks are eight weeks old or more before turning off the heat lamps completely. See the suggestions above for the lower wattage red reptile lights.

*Bantams and smaller or slower developing breeds usually need heat lamps and higher protein feed for longer periods of time. We provide our bantam breeds with higher protein feed their entire lives and heat during the cold winter months.
*Be careful to monitor young pullets and cockerels when you introduce them to your adult birds as they may harm or even kill them. We use a separate pen outside for our younger birds until they are almost fully grown. You can also give them a safe place to hide in the coop such as a smaller pen, kennel or box with a smaller opening.
*We supply our poultry and waterfowl flock with about 30% mixed grains in addition to their daily pelleted feed, especially in the winter months. We give our flock whole wheat, cracked corn and black oil sunflower seeds (BOSS) and a small scoop of kelp meal powder periodically.
 Kelp Meal can be found at your feed store. It is also used by gardeners for plants.
*They also enjoy fresh greens, alfalfa and fruit. Ultra-Kelp meal provides extra vitamins during breeding, cold winter weather and stress periods.
*We provide 1-2 sized grit and oyster shell to all our poultry and waterfowl. It may be added to the feed or given on the side in a smaller container.
*Chickens and especially ducks like course sand in a swallow tub to aid with digestion and to dust bathe in. You can also add some Diatomaceous Earth, wood ashes or sulfur to the dust bathing area for pest control.
*Our poultry usually starts laying at about 6 months of age but there are a lot of factors that determine laying time frames:
-The time of year they were hatched (ie. the sooner the better in spring)
-The feed they are fed (ie higher protein means more eggs and laying sooner).
-Extra treats like greens, vitamins/minerals, apple cider vinegar, kelp, boss sunflower seeds, suet and cracked corn also help especially in winter.
-Health of the flock (ie regular deworming and checking for lice and mites)
-The breed and their development. Some older breeds are slower to grow and produce eggs.
Please find more helpful information on our link page.(click here)
We hope you are very successful with your new poultry and waterfowl!
Question: “Two more of my chicks have died. Do you have any idea what could be going on?”
If you are losing chicks it can be caused by a several different things:
*Chicks are not getting enough heat, so they don’t eat, drink or grow and get sick easily. Look for chicks huddled in corners. Happy chicks should be running around and not crying or huddled.
*Chicks are getting drafts and chills, use an 18 inch brooder guard to keep out drafts.
*The chicks are in a wet and or high humidity environment. They get sick and do not eat or drink. Clean broody pens often. We use some Diatomaceous Earth underneath the shavings to keep the broody pen drier.
*Chicks are getting too much heat and they are exhausted and do not eat drink or eat properly. Look for open beaks and crying as this indicates heat stress.
*Waterer is too far from the heat source they don’t know where is so they don’t seek it out. Move it closer to the heat source but not under it and dip their beaks in it a few times to teach them that it is water. You can also add a second waterer so they all have plenty of water when they need it.
*Water is getting droppings or shavings etc. in it and it is getting contaminated. Put waterer up on wooden or cement blocks above the shavings or hang it and clean it twice a day. Add a tablespoon of apple cider vinegar per gallon of water to kill bacteria and improve health. We add an electrolyte and vitamin mix to the water to boast the immune system and to get them drinking. We may also add a pinch of garlic powder as well.
*Day old chicks cannot find the food as it is covered in shavings, too far from the heat source or hanging too high. Scatter food on a paper towel or shop towel flooring for a few days when you first bring them home and place the feeder in the middle of the brooder floor but not directly under the heat source to train them. You can also add a second feeder.
*Use electrolytes and or vitamins for new, stressed or sick chicks. See the homemade recipe above or look for Electrovite in your feed store. We also use Braggs Apple Cider Vinegar for our chicks daily and it can be found in your local grocery store.
*Antibiotics added to you water or medicated feed may also solve your problem if your chicks are worn out, sick or dying. Ask your veterinarian.
*Chicks don’t do well with too much snuggling. I had a batch get sick and die when some kids visited. The kids kept holding them and opening the door to where the brooder was. Basically, they were grabbing them too much and they were worn out, stressed and chilled.
*If you have sick chicks or are losing chicks try to fix the problem as quickly as possible as they will not survive long without food, water or proper heat.